Showing posts with label play kitchen. Show all posts

Thursday, March 17, 2011

Little Girls' Bedroom Spoiler

The big move hasn't officially happened yet, but redecorating the little girls' room is in full swing. (I will post pictures of the whole room once the bigger girls have moved out) For now, I thought I'd share a few completed projects. The little workbench had been successfully turned into "Little Monkeys' Farm Stand" complete with shopping carts and specials chalk board. If you need to drop off some mail on your way to pick up groceries, there's this little mailbox on the way! Once you've mailed your letters and picked up your groceries, it's time to head home to make dinner (or maybe vacuum or take care of the baby). I am still stocking the kitchen with canned goods and such.

We finally got a bookshelf back in the room (we moved it out last year because Bijou and Zion kept pulling ALL of the books off and throwing them around the room). Now all of the books that have been stored are sorted and shelved. The big girls' books went on the big book shelf in their new room. The little house on top of the book shelf is a super simple little night light that I put together for Bijou (who is afraid of the dark). It's just one of those papier mache houses they sell at Hobby Lobby (about $4) and a battery powered LED touch night light with an adhesive back (about $5). It casts great shafts of light from the windows and door of the little house onto the ceiling and walls of their room at night.

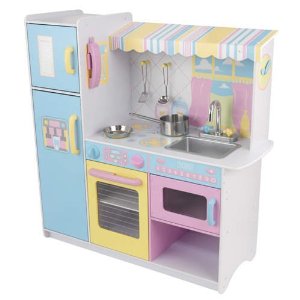
This is the little workbench as it was when we bought it. Notice the curious little one trying to figure out what the heck I'm doing.

A couple of wooden boxes we already had and a plethora of felt food later, they have a cute little market stand.


I painted the black sheep painting for Bijou when she was first born. I think it works well here.


In closet playhouse, complete with vacuum for tidying up!


I didn't really have anything to stock the kitchen pantry, so I saved a couple of cans and glued pictures from magazines to the outside. I just used up some stickers we had in the craft cabinet for the words.


The night light after dark. Looks a little creepy here, but it's not creepy in real life.

And finally, my very sweet little Zion in front of her newly organized bookshelf!

Thursday, May 13, 2010

New(er) Play Kitchen for the kids

So, I might be a little obsessed. I'm not sure why. Maybe I was deprived of a fabulous play kitchen when I was child and have repressed that memory and it is resurfacing as this play kitchen obsession that I seem to have. Who knows. Anyway, I found this kitchen at our local Goodwill on Sunday (yes I spent my Mother's Day at Goodwill). I forgot to take pictures before I took the doors off the microwave and oven. Ooops.


(I'm thinking that this is pretty much what the one I bought would have looked like new. It's very.....pastel.)


Granted, it already pretty cute, but I'm not really a fan of cutesy things. So, I decided to put my style into it. A couple of cans of spray paint, some new hardware, a little creativity and a jar of Mod Podge later, this is the new kitchen the kids have in their room. I had a piece of wood cut at Home Depot to make a refrigerator (that part was missing when I bought it). This kitchen was much more expensive from start to finish than the last one. This one cost around $50 total (I generally like to keep my projects under $20 because I'm cheap). Now I just need to replenish the felt food supply.


Sunday, March 7, 2010

Play Kitchen

Last summer I made the second coming of our cardboard play kitchen that was left behind in St. Croix when we moved. I really liked the cardboard kitchen, but I wanted something sturdier that would last for the next few years. Wooden kitchens in the store are ridiculously expensive and I have been continually inspired by all of the great DIY kitchens like this one over at Kristen Can (and these, oh and this one)! I've been sort of on a hunt for the right piece of furniture (preferable discarded or really cheap second hand) to recon, but haven't been able to find anything. So, yesterday we went out for our first round of yard sale hopping for the season and happened upon a guy selling some old furniture. So I bought this nightstand for $5.


The big girls helped me prime and paint all of the pieces. The nightstand had a drawer that I removed and used the front panel from a different drawer to make the oven door. I had some hinges left over from the cedar chest project back in the fall. The kitchen fixture was part of the cardboard kitchen. It's made from wooden blocks from the kids' block bin, spray painted silver.


I painted the wooden knobs for the stove and Mod Podged the temperature dial onto the back splash. The sink is a plastic bowl that we already had. The last little touch that I really like is the ceramic tiles along the back splash and the shelves. I think it turned out pretty nice.


(gotta love the crazy hair and the galaxy PJ's)
So with a weekend's worth of worth, the little girls have a sturdy wooden kitchen that should last them until they get sick of playing with it. It was a really cheap project in the end. Here are the materials and price breakdown:

nightstand: $5
shelf: $5
wooden knobs: $1.97 (for a package of two. I used two packages)
sandpaper: $2.97
ceramic tiles: $.99 for 8 at Goodwill
blue/green baskets; $1 for 2 at the Dollar Store (my favorite place!)
blocks: FREE
bowl: FREE
paint: FREE
TOTAL: about $19

Oh and I made these cute little salt and pepper shakers from two wooden blocks. I painted them blue with black trim, used my favorite letter stamps for the "S" and the "P" and hot glued a large button to the top of each one. They are my favorite part of the whole project!


Friday, November 13, 2009

Reduce, Reuse, RECONSTRUCT

I am a big fan of cardboard and its many uses. My favorite use right now? Fabulous and virtually free toys for the kids. Because the phrase "starving artist" in heavily weighted in truth, awesome toys can be beyond our financial reach. The solution, my friends? If you can't buy it, recreate it. To date, we've made a lovely kitchen for Bijou complete with sink and oven. She was in desperate need of a place to prepare her array of felt food (I was beginning to miss my pretend meals). It took weeks, but the girls and I finally finished the cardboard dollhouse. AND because I've gotten so much positive feedback, I've decided to complete my illustrated instruction book for both projects. Honestly, I've tired of retyping instructions in emails over and over again. Here are some pictures of Bijou's kitchen (and food) and the dollhouse. Keep and eye out for the instruction books coming soon! At some point I would like to be able to construct a few pieces of cardboard furniture. Keep your fingers crossed.

The dollhouse in its skeletal stage. It's all held together with packing tape and Elmer's.


A fresh coat of yellow picked out by the girlies.

Sandpaper and black construction paper make the shingles on the roof. Shutters and doors added.

The kiddos trying their hand at interior design. Their choice of wall treatments is questionable.


The kitchen. Complete with fridge, stove, oven and sink. The lovely shelf above the stove is cut out of an Ikea catalog.


The living room sofa and more Ikea home furnishings. We are particularly fond of the green lamp.


The completed front door with handle and porch light cut from a home furnishings magazine


Blue bathroom on the third floor.

The family is all moved in and ready to play!


Some pictures of the kitchen, as well as pictures of the felt food I made to go along with it. Some of the food is new, the rest is transplanted from the cardboard kitchen we had in St. Croix.


Some day I will master the blog format....unfortunately it will not be today, blah...